
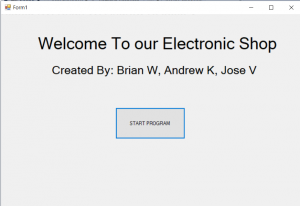
Our Final Project in database is to create a working program that implements database and a graphical user interface (GUI). For our database we use MySQL and Visual Basic for our GUI. MySQL is an open-source relational database management system, this is where I story my tables that contains files. In this project we created 6 tables which are Transaction table, Employee table, Customer table, Branch table, Item table and Payment Table. Each table is an 3NF or third normal form normalization this normalization is a process of restructuring a relational database in accordance with a series of so-called normal forms in order to reduce data redundancy and improve data integrity. When you click “START PROGRAM” you will get to another form. P.S. Coding will be explained after the illustration.
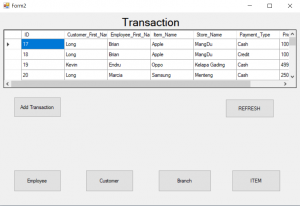
After you click “START PROGRAM” you will get to this form. The data that is displayed in the Data grid view. The ID shows the ID where the transaction is made, the customer’s first name, employee’s first name, and so on until the price that they bought. In this form when you clicked “Add Transaction” it will bring you to next form.
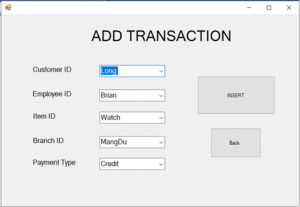
The form “ADD TRANSACTION” is used to insert new data inside the transaction table. In this form I created a combo box in order to link or foreign key everything inside its transaction table. For the “customer ID” Combo box you cannot insert your own key word. This is to minimize errors in inputting the transaction table. For example: in the Customer table there is only three members Long, Kevin, Jason and so if I change the combo into a textbox where you insert each names yourself and you inserted a wrong name the transaction table which is foreign keyed will be disturbed and may show an error. When you finished choosing the customer id, employee id, and so on you can insert it by clicking the “INSERT” button and while the “Back” button will bring you to the transaction table.

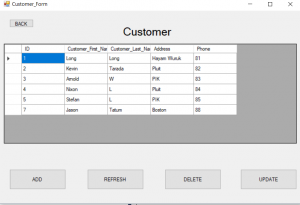
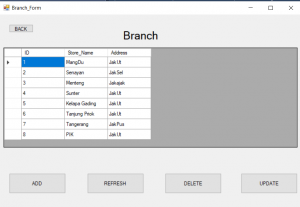
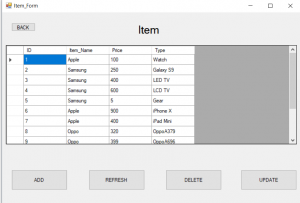
This I the employee Form inside the “Employee” Form there is a same button a “BACK’ button which returns you to the main menu which is the “Transaction Form”, a “ADD” button where you can add members inside the employee table, a “refresh” button where you can refresh if the data is not loaded yet or there is some issues, this is used usually after you deleted an item, a “DELETE” button where you can delete the last item in the table, but this button is not suggested because it can interrupt the transaction table, the “UPDATE” button to change the members data. For the “Delete” button will interrupt the transaction table because for the transaction table we used foreign key on each data so if I say u deleted a member which is inside the transaction key it will delete the data which will also delete everything even the ID itself. The customer form, branch form, and item form is quite similar to the employee form although it have different names and description.
The next form that is similar to each other is the “ADD” form and the “UPDATE” form which will be discussed next. This form is similar to the employee, customer, branch, and item form which they all have the “ADD” button and “UPDATE” button, although they have different descriptions to be filled. For example for the employee form you just need its first name, last name and its phone number ,while the customer require its first name, last name, address and its phone number.
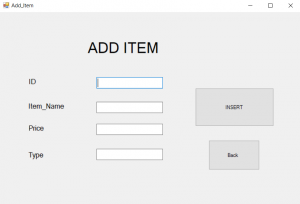
In the ADD form for the item table you are required to add the ID, item name, price, type. For the ID you may leave it blank because it is auto increment but if you have a specific code you can insert it yourself, but for the item name, price, and type you cannot leave it blank. When you have finished inserting the required data you can insert it by clicking the “INSERT” button and it will add it in the item table.
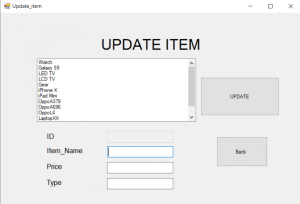
In the update form as you can see it gives you the type that you can update. This is made easier because in MySQL you are required its unique id to change the member’s data. So through this you can just choose which will be updated and it will set its own ID to be changed and again when you are finish you can click the “UPDATE” button to update and “Back” button to go back to the item form.
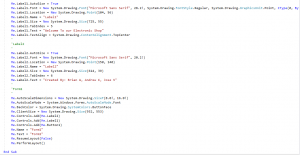
Inside the GUI coding or visual studio the label1 is where I write the “Welcome to our Electronic Shop” as you can see in our Form 1. As for the font and others you can set it in the label1.font, location, etc. Label2 is where “Created by: Brian W, Andrew K, Jose V” is located and written.

The code Main_Menu.show() is the other form which has the transaction table. While me.Dispose() is to dispose this Form so you should not close it by yourself
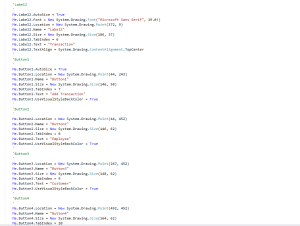
In here the button I can rename it so the user can understand what the button will do. For example: the employee button will set you to go to the employe form.
This code is located in the transaction table. The coding is similar to the coding above where you change to another form by showing and deleting the current form.
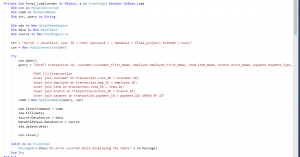
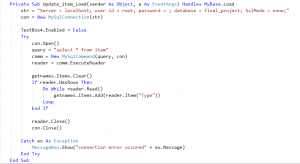
This code shows the transaction table in the transaction form to show the specific member in the table I used inner join. For example the foreign key is usually the unique key or primary key which is the ID but I don’t want to show the id because it is confusing and so I used inner join so it will show the first name or anything that you want to set.
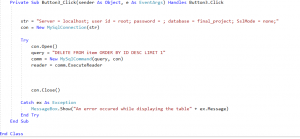
This is similar to the coding above but this is simple because you just need to show each table’s content and it doesn’t have foreign key. This coding is also similar to the other tables such as the customers, employee, branch, etc.
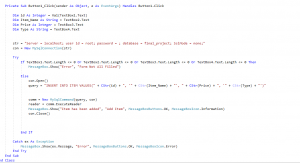
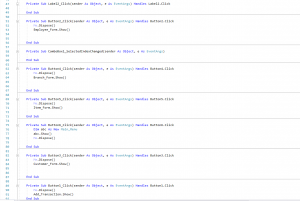
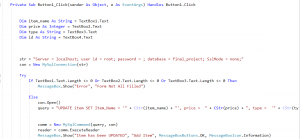
The coding to add the table item is applied in here. In the part of Message.show() “Error, Form not filled” is when you didn’t fill any of the text box it is shown in if textbox.text.length <= 0 this means when there is nothing inside the box it will show the message. While if you have successfully filled it will show in the box where “Item has been added”
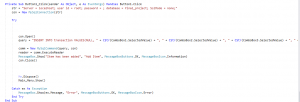
This coding is also an adding coding but this is where you used combo box to minimize errors. As you know the combo box has its own item that it will show itself then if your item is added it will show a message box informing “Item has been added”.
This code lets the user delete the table except from the transaction table because you cannot delete a transaction if it has already happen. To delete we use the query of “delete from item order by desc limit 1”.

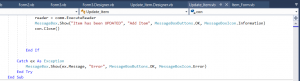
To refresh you just need to create this form with different name like setting abc and disposing this form so that it will start the form newly loaded.
So this code is used to update the specific table. For this query the error message box is still similar to the update above and it requires the new inputs to be change in a textbox so the user is required to fill in the form once it is finish and you clicked on the insert button it will show the item has been updated if it is successful.
After our presentation we didn’t fulfil the required requirements which is less data or entities and less tables. So in order to fill in the requirements we added the table payment type. In the payment we have 2 entities which are cash or credit. This is a suggestion from our teacher that makes sense since before we did text box and it may have different types of method to pay but written in different words. We also added entities to every tables ,because the tables that were made in the demonstration have less entities.